BUILDING THE PROPAGATOR
The size of the propagator you are going to build should fit that of the plastic tray used as saucer where the pots will be placed (available at garden centres in a range of sizes). The following instructions refer to a medium-sized tray.
- Dimensions: planting tray cm. 84 x 40 x 35 (h); drip tray to put underneath cm. 80 x 37 x 4,5 (h);
- Materials: a 4/5 mm-thick-plate glass (you can recycle an old one), or some wood; for the lid we can use plexiglas, perspex, or simply a plastic sheet and, subsequently, we will need a wooden frame with plastic or wire mesh mounted on it. Frost the plate glasses with some sandpaper handling them with care; use silicone to glue the plates together and vinavil for wood.
We can save a good deal of energy by lining the propagator with sheets of expanded polythene or polystyrene, between 1 and 2 cm thick, to be glued on every side except the lid; then you can cover the lining with aluminium foil to maximize light intensity. Finally, cut out a slit in the top of the lid or leave it partially lifted to allow air movement. To build the ultimate DIY propagator you may also install one of those small 12-volt-fans used to cool off computers (either recycle an old one or get it from a flea market at a very cheap price). If built in accordance with these criteria, the propagator can also be used indoors as a heated cabinet for growing seedlings in the wintertime.
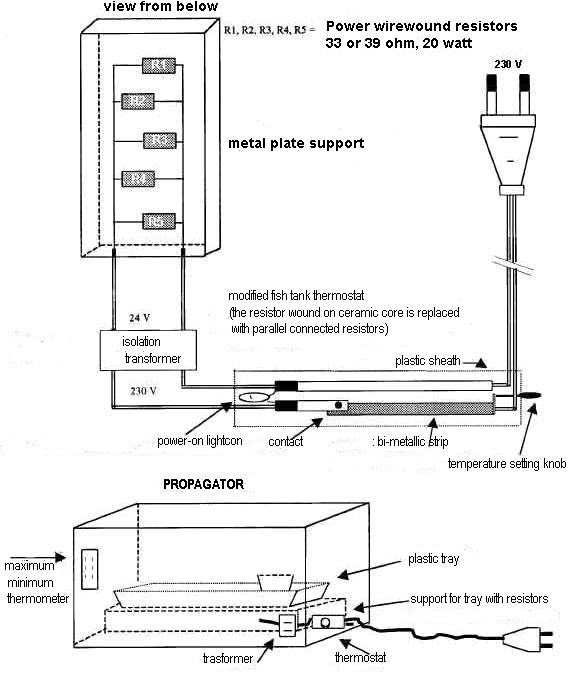
If we use small pots, size cm. 6 x 6 x 7, we can put in place 78 of them; with cm. 7 x 7 x 7 pots only 55 will fit. We might also use a 5 cm or 5.5 cm size and for Mesembs pots measuring cm. 10 x 10 x 10. Underneath the tray we will place a 0.8-mm-thick zinc sheet, bent at 90 degrees along each side, six centimetres from the edge. On the lower side of the sheet we fix four or five power wirewound resistors (the box-shaped ones used in old tv sets, 33 or 39 ohm – 20 Watt power, available at electronic supplies stores) connected in parallel as illustrated in the drawing at the end of the article.
Resistors have to be fastened tightly to the sheet with annealed wire to be passed through two holes drilled into the plate next to each of the long sides of the resistor. In order for the heat to be spread evenly throughout the cabinet, it is advisable to create a gap between the plate and the tray by inserting a few wood sticks, one or two centimetres thick, as spacers.
In compliance with safety regulations we must insert, between the thermostat and the resistors, a 150 watt isolation transformer with 230 V input (primary) and 24 V output (secondary). If you don't really have a bent for DIY there is a simpler way to heat the propagator: just use a hair dryer set at the minimum power and fan speed (about 300/400 W ) and place it level with the tray with its output conduit inserted through a hole cut out in the centre of one of the short sides of the lid, so that it can blow warm air inside the structure. The warm air should flow below a support holding the tray. This solution is not only simple but has the advantage to create good air circulation that, as we well know , inhibits the emergence of fungal diseases.
If even this solution causes you trouble, you might as well resort to a 100 W heating cable which is water-proof and is also practical when growing plants during the winter (available at garden centres, aquarium and reptile supplies stores – generally used for reptile hibernation). In order to optimize heat distribution it is best to bury the cable under 5-6 centimetres of fine sand.
Some use a 60-100 watt light bulb as heating element which, if adequately protected against humidity and water droplets, is another option accessible to everybody. You must be aware that if the light bulb is hit by a squirt of water or droplets of condensation when lit, it will explode. Naturally, if you use a heating cable, a light bulb or a hair dryer you won't need a voltage transformer.
 As for the thermostat, we can use an automatic bi-metallic device designed for fish tanks, 150 Watt power, very similar to that shown in the drawing on the side. After lifting off the cap that seals the appliance, remove the coiled resistor (usually snap-on), which you won't need, and replace it with two electrical wires in order to connect the thermostat with the primary of the isolation transformer and its output (secondary) with the free ends of the wirewound resistors, previously fastened to the plate metal, as explained below in the diagram. Since the glass enclosure cannot be reassembled, in order to avoid electrical shocks and short circuits, it is important to insert the instrument in a plastic tube, having a suitable length and diameter (usually 20 mm.), like the plastic-sheathed cable that protects electrical wires embedded into a wall. Afterwards, cut a hole in the tube in the exact same position as the power-on light so that you know when the heating device is activated. Hang the thermostat inside the propagator (as close as possible to the pots), next to a max/min thermometer. Now there is nothing left to do but put the device to the test and after a few attempts you should be able to set the right temperature. If the propagator is to be placed outside or in a greenhouse, there will be no need for supplementary lighting; natural light is sufficient as long as seeds are sown in spring.
Those who choose, instead, to keep the propagator indoors have to make a few adjustments. First of all, they will have to install two 20-watt-neon lamps with reflector inside the propagator, cover and keep them switched on for 13 to 15 hours a day: a timer will do the job. The pots are to be placed at approximately 20 centimetres from the source of light. You can opt for the kind of lamps used in aquarium tanks1. Luminosity must be about 8000-15000 lux which can be easily measured using a camera light meter set to read 'lux' units. The cover should be made of glass or have a wooden frame in order to sustain the weight of the electrical appliances. Some prefer to place the electrical ballasts inside the cabinet so as to make use of the heat that they emanate; personally I prefer to place them out of the propagator so that they don't interfere with the correct functioning of the thermostat but your choice should also depend on various other factors such as external temperature, the type of insulation installed, the power of the heating element, the warmth given off by the electrical ballasts, therefore you will have to try out different solutions. You should be aware that using the propagator inside the house is not advisable for seeds requiring a large diurnal temperature variation with a low minimum (cold-hardy cacti).
I would like to warn the reader that the above article is intended to provide general guidance only and that no liability is assumed for consequential damages in connection with the use of such information. Working with electricity requires the utmost care so that we do not cause harm or damage when assembling and when utilising the appliances. If you don't feel comfortable doing it on your own, I recommend you get an electrician to do the job, considering that the appliance will be connected to the power grid.
------------------------ note --------------------------
1) - Sylvania Gro Lux™, Sun Glo™, True Lite™, etc. For example two TLD 865 Philips tubes, or, even better, combine an LDJ lamp emitting light mainly in the blu spectrum with a Cool White which provides a red light source. Alternatively, L18W/77 Fluora lamps (Osram) together with L18W/11-860 Lumilux plus daylight; or use a neon tube Cool White with a Warm Tone one (Osram or Philips); another alternative is a Philips TLD 860 lamp plus an Osram 11-860. Or finally, one Sun-Glo 1230 lumen/4200°K neon tube with one Power-Glo 1100 lumen/18000°K (or other brands).
WIRING DIAGRAM SHOWING PLATE METAL SUPPORT FOR TRAY WITH RESISTORS
